Run a Tezos node in 5 steps
As described in Nodes, Tezos nodes are peer-to-peer programs that run the Tezos network. Anyone can run a node, and they might do so for many different reasons, including:
- Running nodes makes the Tezos network resilient and secure
- Public nodes may have rate limits, so running your own node allows you to send unlimited requests to it to get information about Tezos or to send transactions from your dApps
- Running a node is part of being a baker and receiving the rewards for baking
This tutorial covers setting up a Tezos node as a baker, which includes running these processes:
- An Octez node, sometimes referred to as a Tezos node
- A baker daemon
- A DAL node
Why is a DAL node needed?
The Tezos data availability layer (DAL) is a peer-to-peer network that Tezos Smart Rollups can use to fetch data securely. The DAL is a key component for the scalability and bandwidth of Tezos and it's important for bakers to run DAL nodes along with their layer 1 nodes.
When users and dApps submit data to the DAL, bakers use DAL nodes to verify that the data is available. Then the bakers attest that the data is available. Smart Rollup nodes can retrieve the data from DAL nodes only when enough bakers have attested that the data is available. Therefore, the DAL needs bakers who run layer 1 nodes, attesters, and DAL nodes.
In the current implementation of the DAL, bakers do not receive extra incentives for attesting DAL data, but they might in the future. For now, bakers can join the DAL without risking any reward loss, ensuring a smooth transition.
Do you already run a baker?
For current bakers, it's a straightforward process to add a DAL node. If you are familiar with running a node and baker, you can add a DAL node to your existing setup by following the instructions in Running a DAL attester node.
Running a baker and DAL node from start to finish
This guide covers the process of running a node, baker, and DAL node from start to finish, accessible for Tezos users with no prior experience in baking or running nodes. This guide walks you through how to join Ghostnet as a baker and attest the publication of data on the DAL network on Ghostnet. The steps for participating on any other network, including Tezos Mainnet, are similar.
Bakers need attestation rights to attest that data is available on the DAL. Depending on the network, it takes time for bakers to get attestation rights. The delay on Ghostnet is about 3.5 days, so in this tutorial you do setup work, wait 3.5 days for attestation rights, and verify that your DAL node and baker are working properly.
If you don't want to wait that long, you can use Weeklynet, where the delay is about an hour. However, to use Weeklynet, you must use a specific version of the Octez suite. You must also be aware that the network completely resets and moves to a new version of the Octez suite every Wednesday. For information about using Weeklynet, see Testing on testnets.
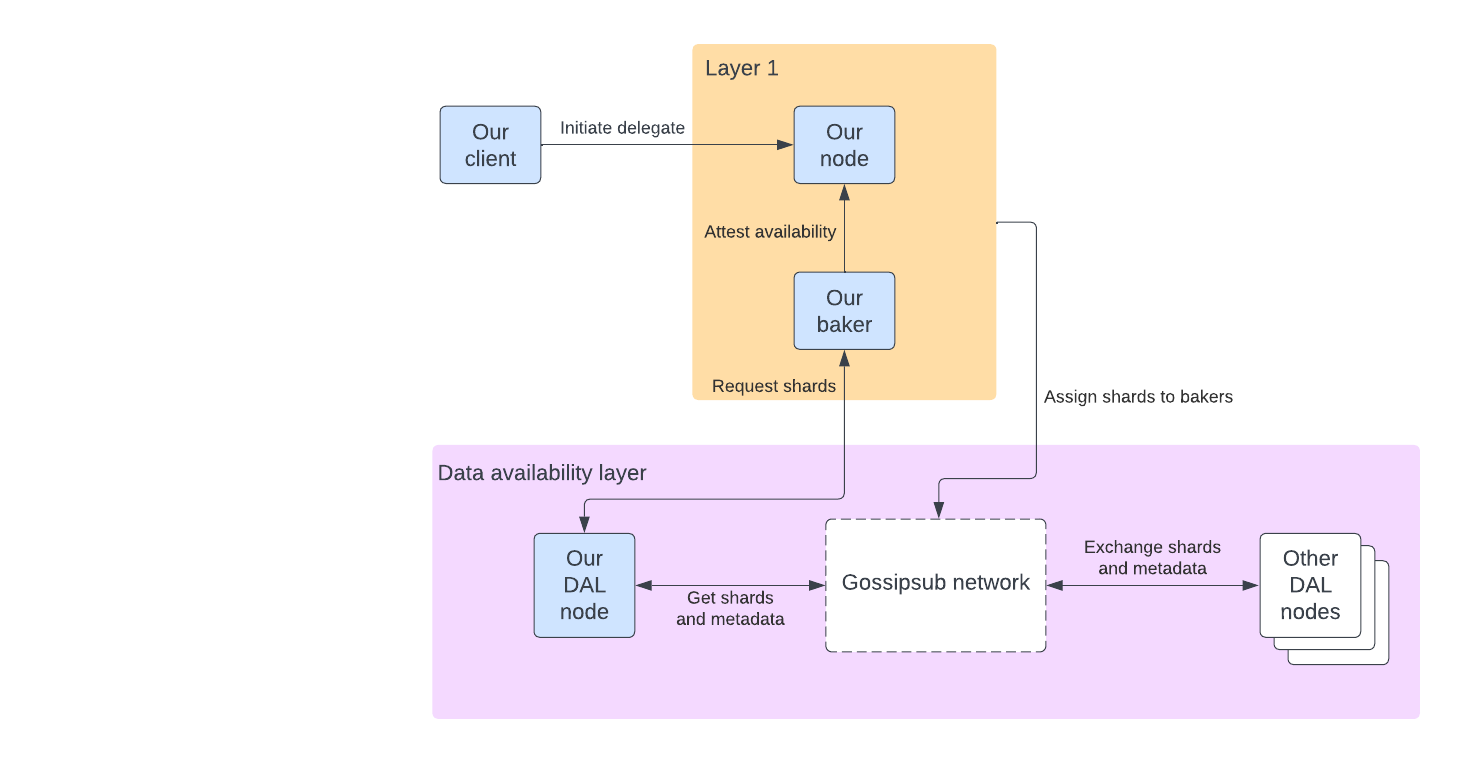
Diagram
In this guide, you set up the Octez client and several Octez daemons, including a layer 1 node, a baker, and a DAL node. The following diagram shows these daemons with a blue background:

Prerequisites
To run the Octez daemons persistently, you need a cloud-based computer or a computer that stays running constantly.
Other options for running a baker
These instructions are for baking with the Octez suite programs. Other tools can help you set up a baker, but they are not covered in these instructions. Here are some of these tools:
- BakeBuddy and Ledger Nano: An intuitive plug-and-use method for setting up a node and baker
- Kiln and Ledger Nano: An intuitive plug-and-use method for setting up a node and baker
- Remote Signer and Ledger Nano
- Signatory's remote Signer via the Cloud
References
- For an overview of the DAL, see Data Availability Layer.
- For an introduction to how the DAL works, see the tutorial Implement a file archive with the DAL and a Smart Rollup.
- For technical information about the DAL, see Data-Availability Layer in the Octez documentation.
Getting started
To get started, go to Step 1: Run an Octez node.